kubectl [command] [자원type] [NAME] [flags]
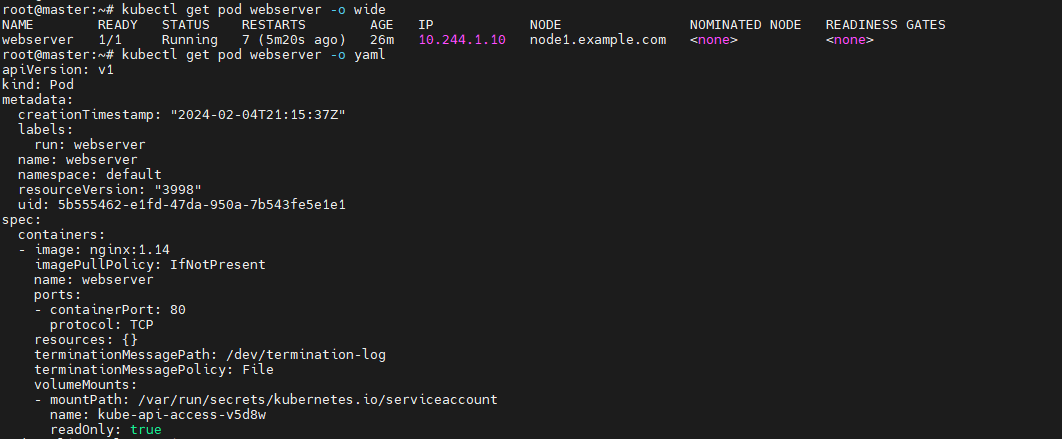
ex. kubectl get pod webserver -o wide
kubectl run <자원이름> <옵션>
kubectl create -f obj.yaml
kubectl apply -f obj.yaml
kubectl get <자원> <객체>
kubectl edit <자원> <객체>
kubectl describe <자원> <객체>
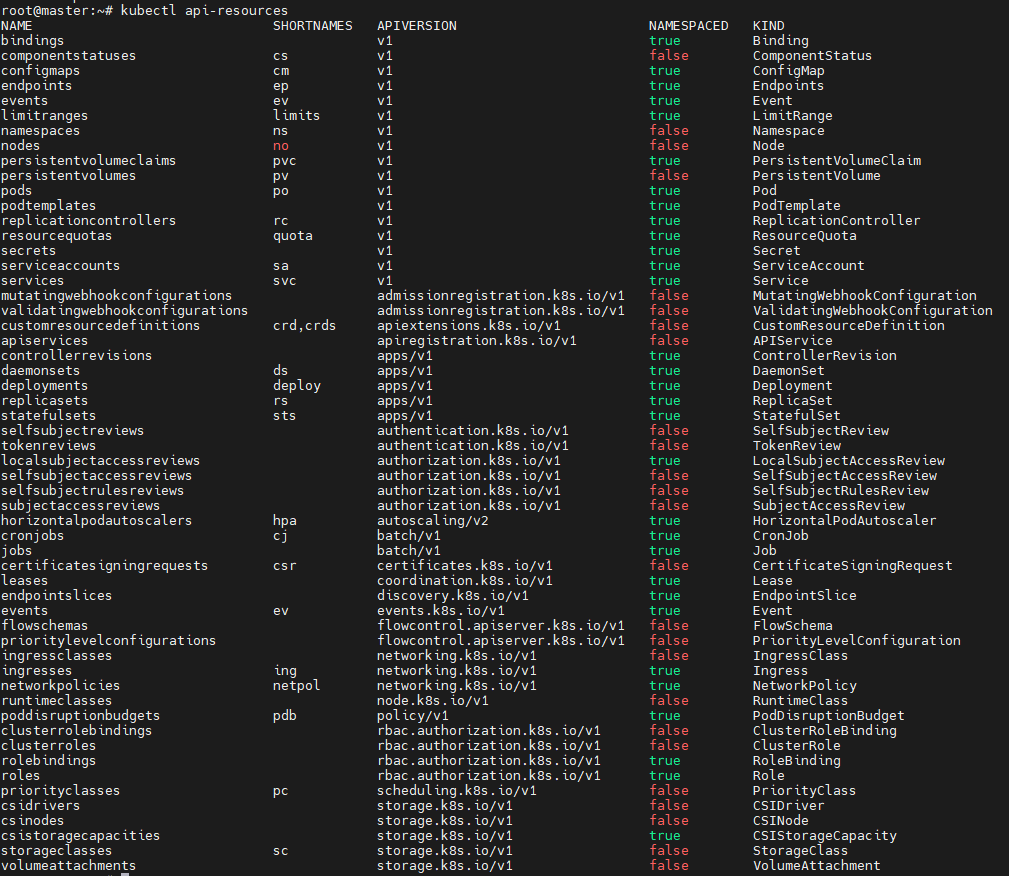
- 클러스터에서 사용할 수 있는 자원 확인
# Node 정보 확인하기
- READY: 파드의 준비상태
- 0/1: 파드는 생성되었으나 사용할 준비가 되지 않았다.
- 1/1: 파드가 생성되었고 사용할 준비가 끝났다.
root@master:~# kubectl get nodes
NAME                 STATUS   ROLES           AGE   VERSION
master.example.com   Ready    control-plane   35d   v1.29.3
node1.example.com    Ready    <none>          35d   v1.29.3
node2.example.com    Ready    <none>          35d   v1.29.3
node3.example.com    Ready    <none>          8d    v1.29.3
root@master:~# kubectl get nodes -o wide
NAME                 STATUS   ROLES           AGE   VERSION   INTERNAL-IP    EXTERNAL-IP   OS-IMAGE             KERNEL-VERSION      CONTAINER-RUNTIME
master.example.com   Ready    control-plane   35d   v1.29.3   10.100.0.104   <none>        Ubuntu 18.04.6 LTS   5.4.0-150-generic   containerd://1.6.21
node1.example.com    Ready    <none>          35d   v1.29.3   10.100.0.101   <none>        Ubuntu 18.04.6 LTS   5.4.0-150-generic   containerd://1.6.21
node2.example.com    Ready    <none>          35d   v1.29.3   10.100.0.102   <none>        Ubuntu 18.04.6 LTS   5.4.0-150-generic   containerd://1.6.21
node3.example.com    Ready    <none>          8d    v1.29.3   10.100.0.103   <none>        Ubuntu 18.04.6 LTS   5.4.0-150-generic   containerd://1.6.21
# 서비스 생성
- CLUSTER-IP: 현재 클러스터 안에 사용되는 IP
- EXTERNAL-IP: 클러스터 외부에서 접속할 때 사용하는 IP (별도로 설정하지 않으면 <None>으로 설정된다.)
root@master:~# kubectl run echoserver --image="k8s.gcr.io/echoserver:1.10" --port=8080
pod/echoserver created
root@master:~# kubectl expose po echoserver --type=NodePort
service/echoserver exposed

root@master:~# kubectl get svc
NAME         TYPE        CLUSTER-IP      EXTERNAL-IP   PORT(S)          AGE
echoserver   NodePort    10.103.4.201    <none>        8080:31868/TCP   20s
kubernetes   ClusterIP   10.96.0.1       <none>        443/TCP          35d

# kubernetes라는 이름의 서비스는 kube-apiserver 관련 파드들을 가리킨다.

# echoserver에 접근할 수 있도록 로컬 컴퓨터로 포트포워딩
root@master:~# kubectl port-forward svc/echoserver 8080:8080
Forwarding from 127.0.0.1:8080 -> 8080
Forwarding from [::1]:8080 -> 8080

soyun@master:~$ curl http://localhost:8080

Hostname: echoserver

Pod Information:
        -no pod information available-

Server values:
        server_version=nginx: 1.13.3 - lua: 10008

Request Information:
        client_address=127.0.0.1
        method=GET
        real path=/
        query=
        request_version=1.1
        request_scheme=http
        request_uri=http://localhost:8080/

Request Headers:
        accept=*/*
        host=localhost:8080
        user-agent=curl/7.58.0

Request Body:
        -no body in request-


# 웹 브라우저에서 http://localhost:8080/로 접속하면 다음 메시지를 확인 가능하다.
# 하지만 우리는 네트워크가 외부와 격리되어 있어 접속 에러가 발생한다.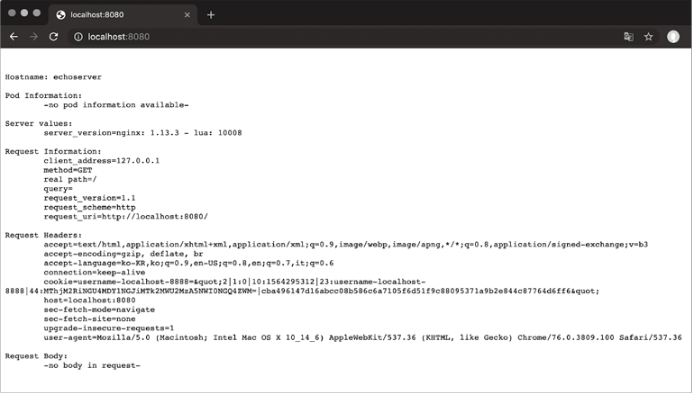
# 외부 노출 다시 연습
root@master:~/Kubernetes-yaml/deployment# cat nginx-app.yaml
apiVersion: apps/v1
kind: Deployment
metadata:
  name: nginx-app
  labels:
    app: nginx-app
spec:
  selector:
    matchLabels:
      app: nginx-app
  replicas: 1
  template:
    metadata:
      labels:
        app: nginx-app
    spec:
      containers:
      - image: nginx
        name: nginx-app
        ports:
        - containerPort: 80


root@master:~/Kubernetes-yaml/deployment# kubectl apply -f nginx-app.yaml
deployment.apps/nginx-app created
root@master:~/Kubernetes-yaml/deployment# kubectl get deployments.apps
NAME        READY   UP-TO-DATE   AVAILABLE   AGE
nginx-app   1/1     1            1           15s


# NodePort 설정
root@master:~/Kubernetes-yaml/deployment# kubectl expose deployment nginx-app --type=NodePort
service/nginx-app exposed
root@master:~/Kubernetes-yaml/deployment# kubectl get svc
NAME         TYPE        CLUSTER-IP      EXTERNAL-IP   PORT(S)          AGE
kubernetes   ClusterIP   10.96.0.1       <none>        443/TCP          35d
nginx-app    NodePort    10.103.24.81    <none>        80:32288/TCP     4s
#  80:32288 : 쿠버네티스 내부의 80번 포트가 32288라는 외부 포트와 연결되었다.

root@master:~/Kubernetes-yaml/deployment# kubectl describe service nginx-app
Name:                     nginx-app
Namespace:                default
Labels:                   app=nginx-app
Annotations:              <none>
Selector:                 app=nginx-app
Type:                     NodePort
IP Family Policy:         SingleStack
IP Families:              IPv4
IP:                       10.103.24.81
IPs:                      10.103.24.81
Port:                     <unset>  80/TCP
TargetPort:               80/TCP
NodePort:                 <unset>  32288/TCP
Endpoints:                10.36.0.3:80 # 서비스에 컨테이너 한 개 연결되었음
Session Affinity:         None
External Traffic Policy:  Cluster
Events:                   <none>
# 실행 중 로그를 수집할 때 'kubectl logs -f xxx'

soyun@master:~$ kubectl logs -f echoserver
Generating self-signed cert
Generating a 2048 bit RSA private key
...............................................................................+++
..................................................................+++
writing new private key to '/certs/privateKey.key'
-----
Starting nginx
127.0.0.1 - - [21/Apr/2024:02:31:43 +0000] "GET / HTTP/1.1" 200 416 "-" "curl/7.58.0"

# 파드와 서비스 삭제
root@master:~# kubectl delete pod echoserver
pod "echoserver" deleted
# 명령 옵션
`-n` : namespace 지정
`-c` : container 지정
`--` : 쿼네티스 관련 옵션 모두 종료한다. -- 이후에 컨테이너에서 실행할 명령 수행
# 특정 노드 상세히 확인
root@master:~# kubectl describe node master.example.com
Name:               master.example.com
Roles:              control-plane
Labels:             beta.kubernetes.io/arch=amd64
                    beta.kubernetes.io/os=linux
                    kubernetes.io/arch=amd64
                    kubernetes.io/hostname=master.example.com
                    kubernetes.io/os=linux
                    node-role.kubernetes.io/control-plane=
                    node.kubernetes.io/exclude-from-external-load-balancers=
Annotations:        kubeadm.alpha.kubernetes.io/cri-socket: unix:///var/run/containerd/containerd.sock
                    node.alpha.kubernetes.io/ttl: 0
                    volumes.kubernetes.io/controller-managed-attach-detach: true
CreationTimestamp:  Mon, 05 Feb 2024 03:47:08 +0900
Taints:             node-role.kubernetes.io/control-plane:NoSchedule
Unschedulable:      false
Lease:
  HolderIdentity:  master.example.com
  AcquireTime:     <unset>
  RenewTime:       Mon, 05 Feb 2024 04:07:25 +0900
Conditions:
  Type             Status  LastHeartbeatTime                 LastTransitionTime                Reason                       Message
  ----             ------  -----------------                 ------------------                ------                       -------
  MemoryPressure   False   Mon, 05 Feb 2024 04:02:30 +0900   Mon, 05 Feb 2024 03:47:08 +0900   KubeletHasSufficientMemory   kubelet has sufficient memory available
  DiskPressure     False   Mon, 05 Feb 2024 04:02:30 +0900   Mon, 05 Feb 2024 03:47:08 +0900   KubeletHasNoDiskPressure     kubelet has no disk pressure
  PIDPressure      False   Mon, 05 Feb 2024 04:02:30 +0900   Mon, 05 Feb 2024 03:47:08 +0900   KubeletHasSufficientPID      kubelet has sufficient PID available
  Ready            True    Mon, 05 Feb 2024 04:02:30 +0900   Mon, 05 Feb 2024 03:47:08 +0900   KubeletReady                 kubelet is posting ready status. AppArmor enabled
webserver는 program이 실행되면서 80 port를 열어서 client connection이 들어오기를 LISTEN(대기)하는 프로그램
# `kubectl run` 으로 컨테이너 실행하기
- kubectl run으로 파드를 실행시킬 때 기본 컨트롤러는 디플로이먼트 이다.
- 명령 전달 구조

# kubectl run 은 직접 contianer를 한 개 실행할 때 사용한다.

root@master:~# kubectl run webserver --image=nginx:1.14 --port 80
pod/webserver created

root@master:~# kubectl get pods
NAME                   READY   STATUS    RESTARTS       AGE
webserver              1/1     Running   0              3s
root@master:~# kubectl get pods -o wide
NAME                   READY   STATUS    RESTARTS       AGE   IP          NODE                NOMINATED NODE   READINESS GATES
webserver              1/1     Running   0              14s   10.36.0.2   node2.example.com   <none>           <none>
# 디플로이먼트 상태 확인
root@master:~# kubectl get deployments
NAME   READY   UP-TO-DATE   AVAILABLE   AGE
web 3/3 3 3 12h- READY: 사용자가 최종 배포한 파드 개수 / 디플로이먼트를 이용해 현재 크러스터에 실재로 동작시킨 파드 개수
- UP-TO-DATE: 디플로이먼트 설정에 정의한 대로 동작중인 신규 파드 개수
- AVAILABLE: 서비스 가능한 파드 개수
더보기
💡 Pod가 Pending 상태이길래 describe로 확인해보니 untolerated taint 에러가 떠있었다.
이 때는 Taint를 지워준 뒤 다시 실행하면 된다.
root@master:~# kubectl get pods
NAME        READY   STATUS    RESTARTS   AGE
webserver   1/1     Pending   0          2m35s

root@master:~# kubectl describe pod webserver
Name:             webserver
Namespace:        default
Priority:         0
Service Account:  default
...
Events:
  Type     Reason            Age   From               Message
  ----     ------            ----  ----               -------
  Warning  FailedScheduling  46s   default-scheduler  0/3 nodes are available: 1 node(s) had untolerated taint {node-role.kubernetes.io/control-plane: }, 2 node(s) had untolerated taint {node.kubernetes.io/not-ready: }. preemption: 0/3 nodes are available: 3 Preemption is not helpful for scheduling.


# Taint가 걸려있는 지 확인
root@master:~# kubectl describe node master.example.com
Name:               master.example.com
Roles:              control-plane
Labels:             beta.kubernetes.io/arch=amd64
                    beta.kubernetes.io/os=linux
                    kubernetes.io/arch=amd64
                    kubernetes.io/hostname=master.example.com
                    kubernetes.io/os=linux
                    node-role.kubernetes.io/control-plane=
                    node.kubernetes.io/exclude-from-external-load-balancers=
Annotations:        kubeadm.alpha.kubernetes.io/cri-socket: unix:///var/run/containerd/containerd.sock
                    node.alpha.kubernetes.io/ttl: 0
                    volumes.kubernetes.io/controller-managed-attach-detach: true
CreationTimestamp:  Mon, 05 Feb 2024 03:47:08 +0900
Taints:             node-role.kubernetes.io/control-plane:NoSchedule

# Tiant 지운 후 재실행하기
root@master:~# kubectl taint node master.example.com  node-role.kubernetes.io/control-plane-
node/master.example.com untainted
root@master:~# kubectl describe node node1 | grep Taints
Taints:             <none>
root@master:~# kubectl describe node node2 | grep Taints
Taints:             <none>
root@master:~# kubectl describe node master | grep Taints
Taints:             <none>


root@master:~# kubectl describe pod webserver
Name:             webserver
Namespace:        default
Priority:         0
Service Account:  default
...
Events:
  Type    Reason     Age   From               Message
  ----    ------     ----  ----               -------
  Normal  Scheduled  12m   default-scheduler  Successfully assigned default/webserver to node2.example.com
  Normal  Pulled     12m   kubelet            Container image "nginx:1.14" already present on machine
  Normal  Created    12m   kubelet            Created container webserver
  Normal  Started    12m   kubelet            Started container webserver
# elinks 이용해서 GUI 기반 Web뷰로 볼 수 있다.
root@master:~# apt-get install elinks
Reading package lists... Done
Building dependency tree... Done
Reading state information... Done
The following package was automatically installed and is no longer required:
  systemd-hwe-hwdb
Use 'apt autoremove' to remove it.
The following additional packages will be installed:
  elinks-data libev4 libfsplib0 liblua5.1-0 libtre5
  ....

root@master:~# elinks 10.244.1.7
-o 옵션을 이용해서 yaml, json 형태로도 확인할 수 있다.
# kubectl create 명령어를 이용해서 Pod 3개 만들기
root@master:~# kubectl create deployment mainui --image=httpd --replicas=3
deployment.apps/mainui created
root@master:~# kubectl get deployments.apps
NAME READY UP-TO-DATE AVAILABLE AGE
mainui 3/3 3 3 35s
root@master:~# kubectl describe deployments.apps mainui
Name: mainui
Namespace: default
CreationTimestamp: Mon, 05 Feb 2024 06:36:14 +0900
Labels: app=mainui
Annotations: deployment.kubernetes.io/revision: 1
Selector: app=mainui
Replicas: 3 desired | 3 updated | 3 total | 3 available | 0 unavailable
StrategyType: RollingUpdate
MinReadySeconds: 0
RollingUpdateStrategy: 25% max unavailable, 25% max surge
Pod Template:
Labels: app=mainui
Containers:
httpd:
Image: httpd
Port: <none>
Host Port: <none>
Environment: <none>
Mounts: <none>
Volumes: <none>
Conditions:
Type Status Reason
---- ------ ------
Progressing True NewReplicaSetAvailable
Available True MinimumReplicasAvailable
OldReplicaSets: <none>
NewReplicaSet: mainui-5886756f68 (3/3 replicas created)
Events:
Type Reason Age From Message
---- ------ ---- ---- -------
Normal ScalingReplicaSet 48s deployment-controller Scaled up replica set mainui-5886756f68 to 3
root@master:~# kubectl get pods -o wide
NAME READY STATUS RESTARTS AGE IP NODE NOMINATED NODE READINESS GATES
mainui-5886756f68-h6czn 1/1 Running 0 2m25s 10.244.1.9 node1.example.com <none> <none>
mainui-5886756f68-jg9nm 1/1 Running 2 (<invalid> ago) 2m25s 10.244.2.4 node2.example.com <none> <none>
mainui-5886756f68-jj29b 1/1 Running 0 2m25s 10.244.0.4 master.example.com <none> <none>
# 작동되는 지 확인
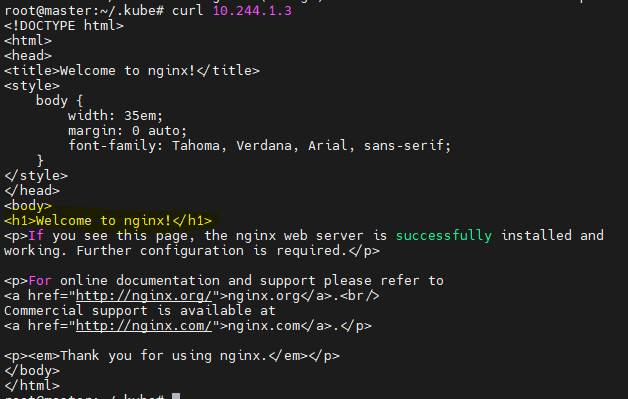
root@master:~# curl 10.244.0.4
<html><body><h1>It works!</h1></body></html>
# nginx에 접속해서 web page 변경해보기
root@master:~# kubectl exec webserver -it -- /bin/bash
root@webserver:/# ls
bin  boot  dev  etc  home  lib  lib64  media  mnt  opt  proc  root  run  sbin  srv  sys  tmp  usr  var
root@webserver:/# cd /usr/share/nginx/html/
root@webserver:/usr/share/nginx/html# ls
50x.html  index.html
root@webserver:/usr/share/nginx/html# cat index.html
<!DOCTYPE html>
<html>
<head>
<title>Welcome to nginx!</title>
<style>
    body {
        width: 35em;
        margin: 0 auto;
        font-family: Tahoma, Verdana, Arial, sans-serif;
    }
</style>
</head>
<body>
<h1>Welcome to nginx!</h1>
<p>If you see this page, the nginx web server is successfully installed and
working. Further configuration is required.</p>

<p>For online documentation and support please refer to
<a href="http://nginx.org/">nginx.org</a>.<br/>
Commercial support is available at
<a href="http://nginx.com/">nginx.com</a>.</p>

<p><em>Thank you for using nginx.</em></p>
</body>
</html>

# 바꿀 내용 집어넣기
root@webserver:/usr/share/nginx/html# echo "SYYUN web" > index.html

root@webserver:/usr/share/nginx/html# cat index.html
SYYUN web
root@webserver:/usr/share/nginx/html# exit
exit

# 확인
root@master:~# curl 10.244.1.21
SYYUN web
# 파드의 로그 확인하기
root@master:~# kubectl logs webserver
10.244.0.0 - - [04/Feb/2024:22:04:16 +0000] "GET / HTTP/1.1" 200 10 "-" "curl/7.81.0" "-"
# 외부에서 해당 웹서버의 80으로 들어오면 80포트로 포트 포워딩해주도록 설정하기
root@master:~# kubectl port-forward webserver 80:80
Forwarding from 127.0.0.1:80 -> 80
Forwarding from [::1]:80 -> 80
Handling connection for 80
# 동작중인 object를 수정할 때는 edit 커맨드를 사용한다.
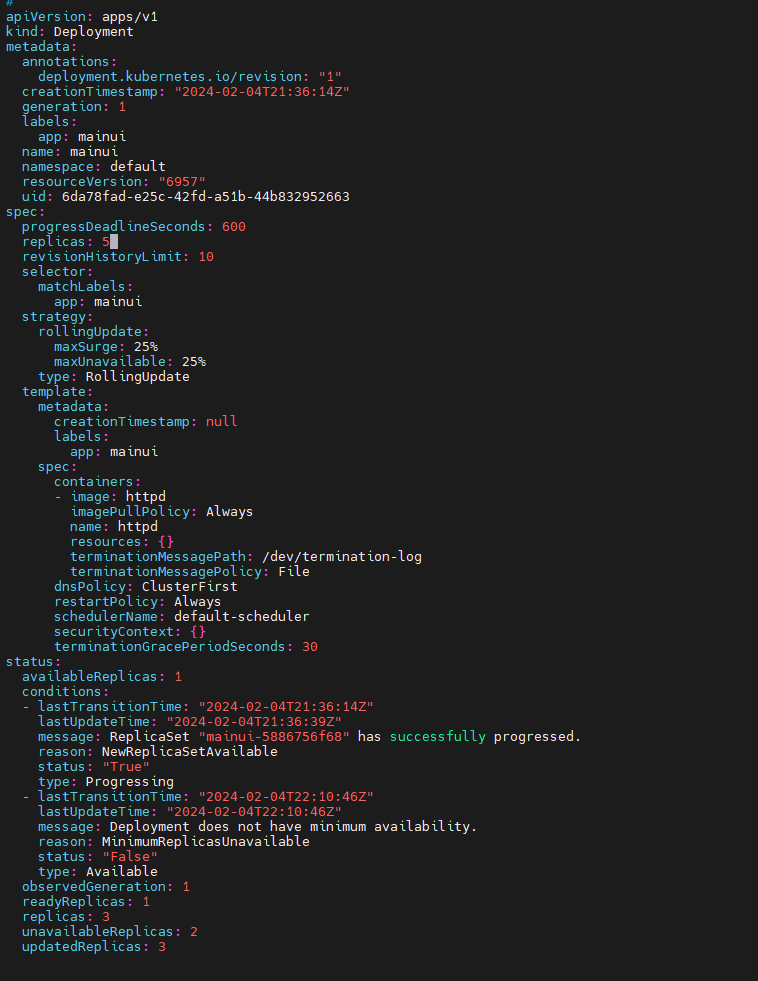
root@master:~# kubectl edit deployments.apps mainui
deployment.apps/mainui edited

root@master:~# kubectl get pods
NAME                      READY   STATUS    RESTARTS            AGE
mainui-5886756f68-45mgm   1/1     Running   0                   77s
mainui-5886756f68-h6czn   1/1     Running   0                   38m
mainui-5886756f68-jg9nm   1/1     Running   0                   38m
mainui-5886756f68-jj29b   1/1     Running   0                   38m
mainui-5886756f68-p54rd   1/1     Running   0                   77s
webserver                 1/1     Running   0                   12m
# yaml 파일로 Pod 생성하기
# 문제가 있는지 없는지 확인하기 : dry-run
root@master:~# kubectl run webserver --image=nginx:1.14 --port 80 --dry-run
W0205 07:17:12.952158   95986 helpers.go:704] --dry-run is deprecated and can be replaced with --dry-run=client.
pod/webserver created (dry run)

# 실행할 수 있는 상태를 yaml 파일로 보기
root@master:~# kubectl run webserver --image=nginx:1.14 --port 80 --dry-run -o yaml
W0205 07:18:19.914936   96285 helpers.go:704] --dry-run is deprecated and can be replaced with --dry-run=client.
apiVersion: v1
kind: Pod
metadata:
  creationTimestamp: null
  labels:
    run: webserver
  name: webserver
spec:
  containers:
  - image: nginx:1.14
    name: webserver
    ports:
    - containerPort: 80
    resources: {}
  dnsPolicy: ClusterFirst
  restartPolicy: Always
status: {}

# yaml 파일로 저장하기
root@master:~# kubectl run webserver --image=nginx:1.14 --port 80 --dry-run -o yaml > webserver-pod.yaml
W0205 07:18:37.717028   96361 helpers.go:704] --dry-run is deprecated and can be replaced with --dry-run=client.

# Webserver Pod를 실행하는 yaml 파일 만들기
root@master:~# vi webserver-pod.yaml
root@master:~# cat webserver-pod.yaml
apiVersion: v1
kind: Pod
metadata:
  labels:
    run: webserver
  name: webserver
spec:
  containers:
  - image: nginx:1.14
    name: webserver
    ports:
    - containerPort: 80


# 기존에 존재하는 Pod를 삭제하고 yaml 파일로 적용하기
#    (있는 상태에서 yaml 적용하면 에러난다.)
root@master:~# kubectl delete pod webserver
pod "webserver" deleted
root@master:~# kubectl delete deployments.apps mainui
deployment.apps "mainui" deleted

#삭제 확인
root@master:~# kubectl get pods
No resources found in default namespace.

# -f 이용해서 yaml 적용해서 webserver 만들기
root@master:~# kubectl create -f webserver-pod.yaml
pod/webserver created
root@master:~# kubectl get pods
NAME        READY   STATUS    RESTARTS   AGE
webserver   1/1     Running   0          10s
root@master:~# kubectl get pods -o wide
NAME        READY   STATUS    RESTARTS   AGE   IP            NODE                NOMINATED NODE   READINESS GATES
webserver   1/1     Running   0          21s   10.244.1.39   node1.example.com   <none>           <none>
반응형
'Container > Kubernetes' 카테고리의 다른 글
| [K8S] Liveness Probe (Self-healing) Pod (1) | 2024.02.16 |
|---|---|
| [K8S] YAML 템플릿 및 Pod (0) | 2024.02.13 |
| [K8S] namespace란 (0) | 2024.02.13 |
| [K8S] 쿠버네티스 개념 및 Architecture (0) | 2024.02.09 |
| Kubernetes 환경 구성 (0) | 2024.02.03 |


